In this post, we will look at how we can deploy our Django app using the Microsoft Azure app service - a free plan.
You need an Azure account, Visual Studio Code editor, and your developed Django App to follow the below steps. If you don't have an Azure account, you can create a free account by going to this URL Microsoft Azure
I have developed a simple web app using Django, which renders an HTML page to explain this topic. If you have a dependency on databases like Postgres or Azure storage, those also need to be configured.
Create a Web App in Azure:
Let's first start with setting up the app service plan in Azure.
I will show you how you can create a web app from the Azure portal. There are other ways of creating a web app too which is from VS code using Azure Tools Extension or Azure CLI. If you are comfortable with other steps, you can follow those. Otherwise, you can follow the below steps
- In the Azure portal, search "app service" in the search bar at the top of the portal. Select the App Service under the services menu.
- Select "+ Create" on the App service page.
- This will open a Create Web App prompt. In that form, fill your resource details
- Resource Group - You can either use an existing one or create a new resource group for your web apps - WebApp-Python-Grp
- Name - Name of your web app and it has to be unique across Azure - Geek4Tutorial
- Runtime Stack - Python 3.9
- Region - Any Azure region which is closest to your business needs - Central India
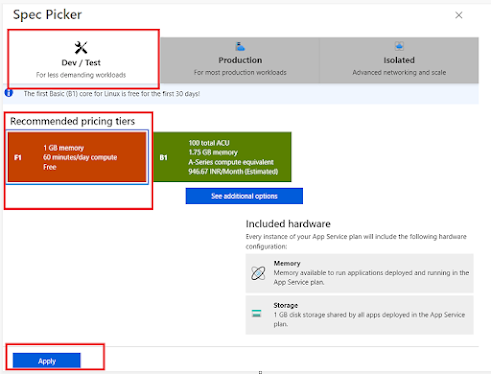
- App Service Plan - Here is the most important step, because the selection of an App Service Plan is totally based on your business needs, and it affects the cost and the performance(CPU/Memory) of the service. Since we are just deploying our sample app, I'm going to use a free tier plan. To set the free tier, select "Change Size" under Sku and Size.
- In the Spec Picker prompt, select "Dev/Test" and select "F1- Free Tier" plan. B1 basic plan will provide better performance when compared to F1 but this will incur a small charge. When finished, select "Apply".
- On the main page, select "Review + Create". This will take us to the Review page and select "Create" to complete the App Service Creation.
- That's it, our web app is ready. Now let's jump on to deploy our Django app to our web app which we just created.
- There are multiple methods supported by Azure to deploy your code to the Azure web app including GitHub actions with CI/CD tools. Here, I will show you how to deploy your Django code directly from your local workstation Visual Studio Code editor by using Azure Extension.
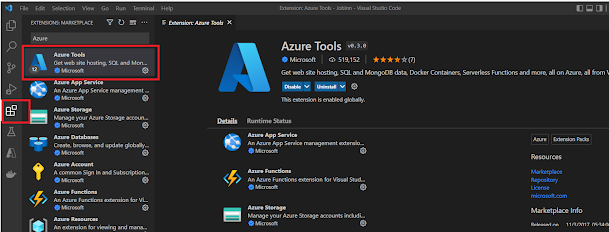
- Let's jump to Visual Studio Code and open Extensions pane(Ctrl + Shift + X). Search Azure Tools and install it. This extension pack includes all of the things we need to deploy and manage Azure from VSCode.
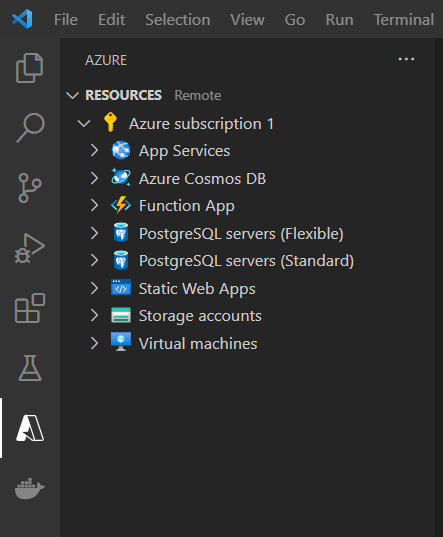
- Once the installation completes, an Azure icon will be added to the left side options. If you open the icon, it will ask you to sign in for the first time through a prompt.
- Now let's have a look at the web app that I have built using Django which is running on a local server (localhost). A single-page app that just renders an HTML page. I hope you might have built some apps using Django and have it handy to try out the deployment using Azure Web App.
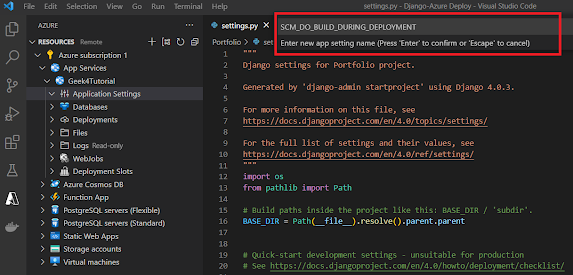
- Open your App Services in your Azure pane then go to your web app application settings. We need to add new settings in the web app before deploying our code. Right-click on the application setting and select "Add New Setting".
- After selecting "Add New Setting", a prompt will appear at the top where enter the below highlighted setting and press Enter.
- Next, it will ask for a value. Enter 1 in the prompt and Enter to confirm.
- Basically, this setting says that once you have deployed your application, it is going to pull and install all the dependencies for the app without manual intervention.
- Next, we have to update our settings file for deployment.
- Set the Debug flag to False
- Allowed host has to be updated with a new domain name that we are provisioning our website. Here I'm going to deploy to my Azure web app "geek4tutorial.azurewebsites.net", so I added this domain name in the allowed host.
- To serve static files, we are going to use whitenoise package. Add whitenoise in requirements.txt and also add whitenoise middleware in the settings file.
- Next, we will add static files storage and static files root.
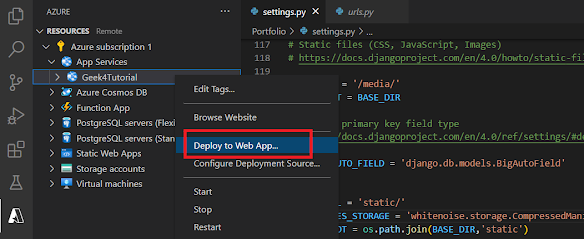
- We are all set to deploy our app. Go to the Azure pane and right-click on the web app. Select the "Deploy to Web App" option.
- This will start to deploy your code. you can check the status of deployment from the output window.
- Once your deployment gets successfully completed, you will be notified. Then you can visit your web app using your domain name. Here, the domain is https://geek4tutorial.azurewebsites.net
- There we go! we have successfully deployed our Django web app to the Azure cloud. Now the web app can be accessed from the internet from anywhere in the world. But remember, we have used the free tier plan which is the least in the performance. It is always recommended to use a standard/basic plan for better performance.
- Congratulations for following along and if you successfully deployed your Django app to the Azure cloud. Hopefully, this helps you.








No comments:
Post a Comment